
使用 CentOS 7 和 PackStack 部署 OpenStack
本文最近更新于 2017 年 11 月 30 日 ,横滨
本文介绍 Windows 7 平台使用 CentOS 7 和 PackStack 部署 OpenStack 的方法。
准备工作
虚拟机软件:VirtualBox
CentOS 镜像:CentOS-7-x86_64-DVD-1511.iso
由于 CentOS 不断更新,服务器上面可供下载的镜像版本会随之变化。如果需要某特定版本的 CentOS 镜像可以到 https://www.centos.org/download/ 下载。
安装 CentOS
下载好 VirtualBox 和 CentOS 镜像后,继续安装 VirtualBox 和 CentOS。整个通过 PackStack 部署 OpenStack 的基本流程为:
安装好 VirtualBox 后,通过 VirtualBox 创建 VM。创建过程中需要根据上面的 ISO 镜像配置我们的 VM,例如 Type(类型) 为 Linux,Version(版本) 为 Red Hat (64-bit),建议 Memory Size(内存) 设置 8 GB,生成的 Hard Disk(硬盘) 设置 250 GB。Hard Disk file type(硬盘文件类型) 使用 VDI 即可。
若仅出于搭建 OpenStack 目的,以 OpenStack Ocata 版本为例,Memory Size 4 GB,Hard Disk 10 GB 即可。
有了 VM 接下来需要在该 VM 上面安装 CentOS,关于如何在 VirtualBox VM 上面安装 CentOS 方法的帖子网上很多,在此不再赘述。
例如:Installation of CentOS 7.3 Guide
注意在正式安装 CentOS 之前的配置系统环节(时区、网络、程序等),建议正确勾选时区和设置时间;CentOS 默认程序尽量勾选完整,如果不清楚具体程序是干什么的,干脆直接勾选上,确认无用的果断放弃,例如传真、视频等;另外,GUI/Desktop/KDE/GNOME 类的勾选上吧,对于初学者来说 GUI/Dashboard 总是直观的,整面屏的 terminal 真的没法搞 OpenStack;网络部分保持默认就好了。
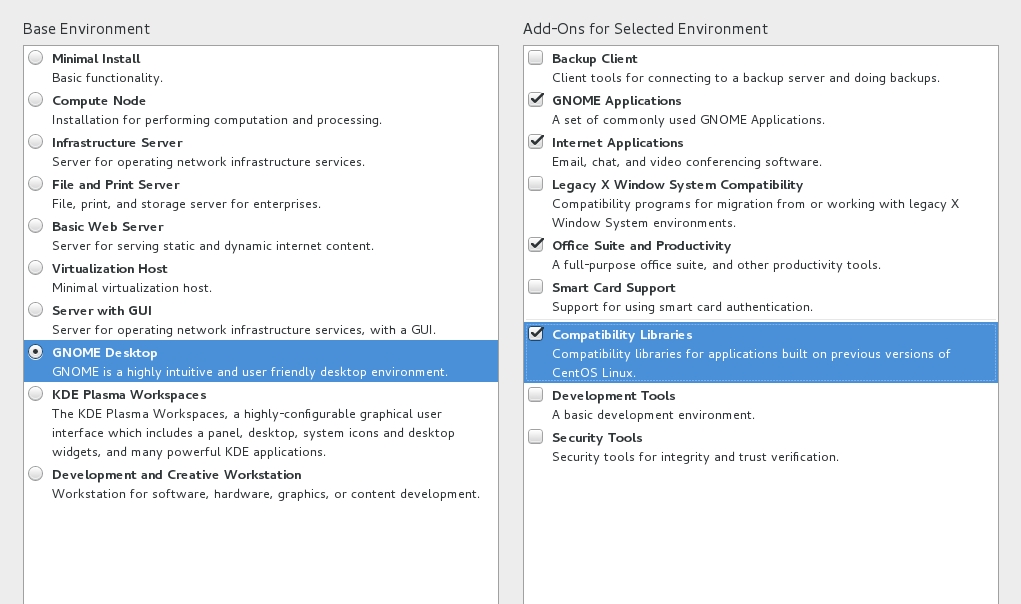
CentOS Software Selection
例如,我选择的是 Development and Creative Workstation,Add-Ons 部分除了传真、视频等,其余全部勾选。
呐呐,我是不是说过 Hard Disk(硬盘) 尽量设置大一些~如果之后出现磁盘空间不足的情况,记得回来看这里:参考扩大 VMware 的 Linux 硬盘容量一文,使用 gparted 进行扩展。
安装好 CentOS 虚拟机后遇到的问题
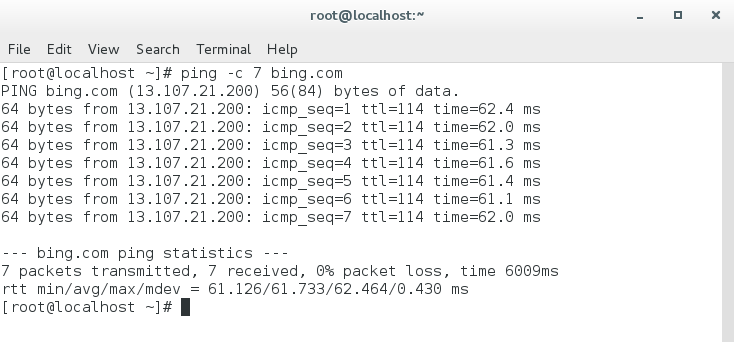
在 VirtualBox 中安装 CentOS 7 之后,网络无法访问,如果我们尝试 ping 某个地址(例如 ping bing.com),会直接提示 unknown host,修复方法如下:
1) 在虚拟机网络中设置 Adapter 1 中,配置如下:

注意其中 Adapter Type 根据实际物理网卡情况选择。
关于 Bridged,NAT 和 Host-only:Bridged,NAT 和 Host-only 到底是什么?
2) 在 CentOS 中添加 device eth0,编辑 vi /etc/sysconfig/network-scrips/ifcfg-eth0,内容如下:
DEVICE=eth0
HWADDR=08:00:27:74:22:04
ONBOOT=yes
NM_CONTROLLED=yes
BOOTPROTO=dhcp
注意其中 HWADDR 为 MAC Address,要与上面的 Adapter 1 中的值保持一致。
3) 然后 halt --r 重启机器,再次 ping 一个网络地址应该会发现已经可以通了。
但是到这里,还有一个问题:在宿主机无法 ping 通虚拟机,也就是说我们无法在 Windows 上面使用 terminal 登录管理 CentOS 虚拟机。
本机 IP:
# ip a
1: lo: <LOOPBACK,UP,LOWER_UP> mtu 65536 qdisc noqueue state UNKNOWN
    link/loopback 00:00:00:00:00:00 brd 00:00:00:00:00:00
    inet 127.0.0.1/8 scope host lo
       valid_lft forever preferred_lft forever
    inet6 ::1/128 scope host
       valid_lft forever preferred_lft forever
2: eth0: <BROADCAST,MULTICAST,UP,LOWER_UP> mtu 1500 qdisc pfifo_fast state UP qlen 1000
    link/ether 08:00:27:74:22:04 brd ff:ff:ff:ff:ff:ff
    inet 10.0.2.15/24 brd 10.0.2.255 scope global dynamic eth0
       valid_lft 77750sec preferred_lft 77750sec
    inet6 fe80::a00:27ff:fe74:2204/64 scope link
       valid_lft forever preferred_lft forever
3: virbr0: <NO-CARRIER,BROADCAST,MULTICAST,UP> mtu 1500 qdisc noqueue state DOWN
    link/ether 52:54:00:df:e3:4d brd ff:ff:ff:ff:ff:ff
    inet 192.168.122.1/24 brd 192.168.122.255 scope global virbr0
       valid_lft forever preferred_lft forever
4: virbr0-nic: <BROADCAST,MULTICAST> mtu 1500 qdisc pfifo_fast master virbr0 state DOWN qlen 500
    link/ether 52:54:00:df:e3:4d brd ff:ff:ff:ff:ff:ff`
在宿主机 ping 虚拟机:
$ ping -n 5 10.0.2.15

Pinging 10.0.2.15 with 32 bytes of data:
Request timed out.
Request timed out.
Request timed out.
Request timed out.
Request timed out.

Ping statistics for 10.0.2.15:
    Packets: Sent = 5, Received = 0, Lost = 5 (100% loss),
解决方法:
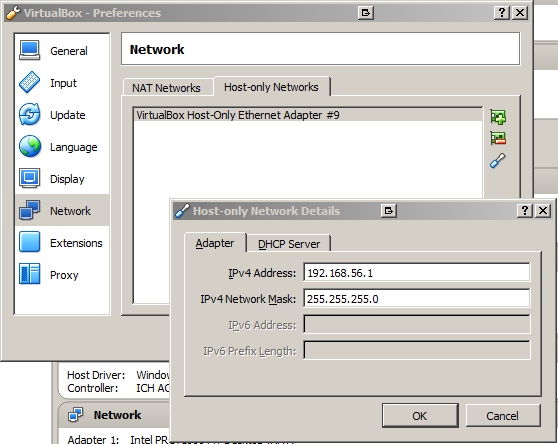
1) 点击 VirtualBox - File - Preferences - Network - Host-only Networks,检查其中的网卡信息。
正常在其中应该可以看到一个 VirtualBox Host-Only Ethernet Adapter,该网卡是我们安装 VirtualBox 后,在系统中虚拟出的一个网卡,地址一般为 192.168.56.1,使用 Host-Only 连接方式,是宿主机和虚拟机互访的桥梁。
2) 在 CentOS 虚拟机的网络中配置 Adapter 2 中,配置如下(记下 MAC Address,下一步要用到):
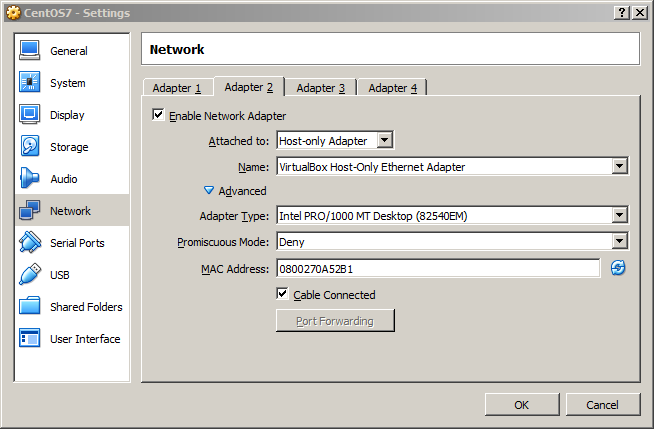
注意其中 Adapter Type 根据实际物理网卡情况选择(与 Adapter 1 的配置保持一致);勾选 Cable Connected。
3) 启动虚拟机,为 Adapter 2 配置 eth1。编辑 /etc/sysconfig/network-scripts/eth1 写入如下内容:
DEVICE=eth1
HWADDR=08:00:27:0A:52:B1
ONBOOT=yes
NW_CONTROLLED=yes
BOOTPROTO=dhcp
当然也可以为其配置固定 IP,只要在 192.168.56.1⁄24 网络范围内就行。例如:
DEVICE=eth1
HWADDR=08:00:27:0A:52:B1
ONBOOT=yes
NW_CONTROLLED=yes
BOOTPROTO=static
IPADDR=192.168.56.2
NETMASK=255.255.255.0
NETWORK=192.168.56.1
注意其中 HWADDR 为 MAC Address,要与上面的 Adapter 2 中的值保持一致。
如果我们为 eth1 配置了固定 IP,例如是粘贴的上面的配置内容(192.168.56.2),这时在 Windows 上面我们就可以使用 terminal ssh <username>@192.168.56.2 访问和管理 CentOS 虚拟机了;如果采用的是 dhcp 方式配置 eth1,我们则需要先访问 CentOS 使用 ifconfig eth1 查看取得 eth1 的 IP 地址后登录。
我在配置到这一步时,发现之前 eth0 的 IP(10.0.2.15) 不见了,也就无法访问 OpenStack dashboard GUI 了。明显是因为上一步在 CentOS 虚拟机的网络中配置 Adapter 2 导致的,但是具体原因不清楚。通过手动配置恢复 eth0 的 IP 即可正常访问 OpenStack dashboard GUI。编辑 /etc/sysconfig/network-scripts/eth0 写入如下内容:
DEVICE=eth0
HWADDR=08:00:27:79:2E:46
ONBOOT=yes
NW_CONTROLLED=yes
BOOTPROTO=static
IPADDR=10.0.2.15
NETMASK=255.255.255.0
NETWORK=10.0.2.1
注意其中 HWADDR 为 MAC Address,要与上面的 Adapter 1 中的值保持一致。
开始安装
确认 CentOS 版本:
# cat /etc/redhat-release
CentOS Linux release 7.2.1511 (Core)
网络准备:
$ sudo systemctl disable firewalld
$ sudo systemctl stop firewalld
$ sudo systemctl disable NetworkManager
$ sudo systemctl stop NetworkManager
$ sudo systemctl enable network
$ sudo systemctl start network
禁用 Selinux 策略 vi /etc/selinux/config 使其中的 SELINUX=disabled。
— 分割线 —
下面关于 hostname 的步骤非必须做的。
通过 hostnamectl set-hostname xxx.xxx 配置 hostname,例如 hostnamectl set-hostname cloud.centos.lan,使用 hostname 命令可以查看修改好的 hostname。
接下来可以将 hostname 写入 /etc/hosts 中。例如:
# cat /etc/hosts
127.0.0.1   localhost localhost.localdomain localhost4 localhost4.localdomain4
::1         localhost localhost.localdomain localhost6 localhost6.localdomain6
10.0.2.15 jason jason.centos
— 分割线 —
语言环境设置 vi /etc/environment:
LANG=en_US.utf-8
LC_ALL=en_US.utf-8
reboot 重启虚拟机,然后继续执行如下指令开始安装 OpenStack Ocata 版本:
$ sudo yum install -y centos-release-openstack-ocata
$ sudo yum update -y #遇到 Multilib version problems 报错解决方法见下方
$ sudo yum install -y openstack-packstack
$ sudo packstack --allinone
执行 sudo yum update -y 时遇到如下的报错:
Error:  Multilib version problems found. This often means that the root
       cause is something else and multilib version checking is just
       pointing out that there is a problem. Eg.:

         1. You have an upgrade for sip which is missing some
            dependency that another package requires. Yum is trying to
            solve this by installing an older version of sip of the
            different architecture. If you exclude the bad architecture
            yum will tell you what the root cause is (which package
            requires what). You can try redoing the upgrade with
            --exclude sip.otherarch ... this should give you an error
            message showing the root cause of the problem.
         2. You have multiple architectures of sip installed, but
            yum can only see an upgrade for one of those architectures.
            If you don't want/need both architectures anymore then you
            can remove the one with the missing update and everything
            will work.

         3. You have duplicate versions of sip installed already.
            You can use "yum check" to get yum show these errors.

         ...you can also use --setopt=protected_multilib=false to remove
         this checking, however this is almost never the correct thing to
         do as something else is very likely to go wrong (often causing
         much more problems).

         Protected multilib versions: sip-4.14.6-4.el7.i686 != sip-4.19-1.el7.x86_64
查看 CentOS 的 sip 版本如下:
[root@localhost ~(keystone_demo)]# rpm -qa | grep -i sip
sip-macros-4.14.6-4.el7.x86_64
sip-4.14.6-4.el7.x86_64
sip-devel-4.14.6-4.el7.x86_64
[root@localhost ~(keystone_demo)]#
解决方法:卸载并重装 sip(系统会卸载掉当前的 sip-4.14.6-4.el7.x86_64 并安装新版 sip-4.19-1.el7.x86_64 和 sip-macros)或者使用 。卸载和重装命令如下:–setopt=protected_multilib=false 跳过检查
rpm --erase=sip
yum install sip
等待安装完成,耗时取决于网速。
我的安装 log:link
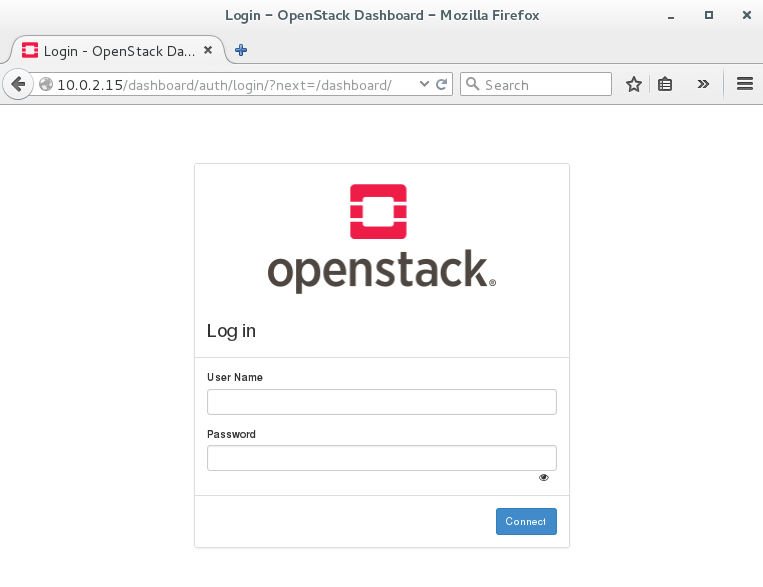
安装完成后,在 CentOS 中通过 https://<虚拟机地址>/dashboard/ 即可访问 OpenStack dashboard GUI。用户名和密码在 /root/keystonerc_xxx 中。
附:如何让 VirtualBox 虚拟机的分辨率自适应其窗口大小
1) 点击 VirtualBox 的菜单 设备(D) -> 安装增强功能(I)...
2) 虚拟机中将自动加载 VBOXADDITIONS 虚拟光盘
3) 如果上一步没有自动加载,可以在虚拟机中打开终端窗口,执行如下命令:
$ cd /run/media/<username>
$ cd <VBOXADDITIONS_x.x.x>
$ ./VBoxLinuxAdditions.run
4) 虚拟机开始编译内核增加新的模块。
5) 安装成功后,重启虚拟机。
6) 点击 VitalBox 的菜单 控制(M),会发现其中的菜单项 Enter Seamless Mode 和 Disable Guest Display Auto-resize 不再是灰色,点击 自动调整窗口大小 菜单项
完成上述步骤后,VirtualBox 中的虚拟机屏幕分辨率会随着 VirtualBox 窗口的大小而自动调整大小。
VirtualBox 增强功能包的下载地址:link
进入相应版本路径下,选择 Oracle_VM_VirtualBox_Extension_Pack-<version>-<xxxxx>a.vbox-extpack 下载(注意版本一致)。
扩展阅读:
更新历史:
2017/05/15 初稿发布
2017/05/16 添加 flowchart
2017/06/05 添加 OpenStack dashboard GUI
2017/06/06 更新宿主机与虚拟机的联通方法
2017/06/07 更新 CentOS 下载地址,Multilib version problems 修复方法
2017/06/16 附我的 PackStack 安装 log
2017/08/10 更新 RDO 链接
2017/11/30 增加 VirtualBox 安装版本建议、CentOS Software Selection 和 Installation of CentOS 7.3 Guide 链接,更新“分辨率自适应”部分
参考链接:
Packstack quickstart
Installing and configuring RDO
最近更新: